Tuesday, November 6, 2018

New Website Launched!

To better facilitate my style of sharing work, I have opted to use more of a gallery type website rather than just a blog.  After having just about every medium I consume advertise it in some way or another, I've decided to try building that site with wix.com.  The new site does also contain a blog, but also features a gallery of pinned images and video links to my demo reel and short film.

This does of course mean that I intend this to be my last post with Blogger.  I thank them for their amazing tool and wish them all the best!

Check out the new webpage here: https://noelru2000.wixsite.com/octachorondigital


Saturday, July 30, 2016

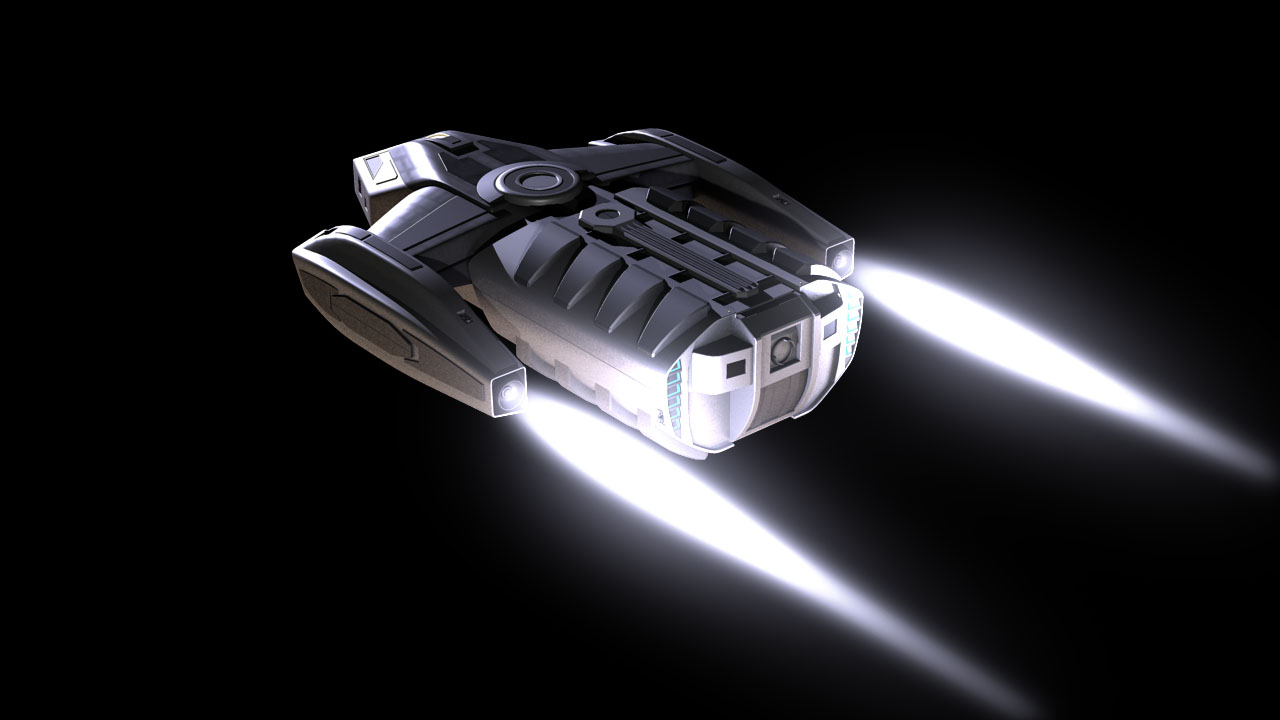
Type 15 Shuttlecraft WIP

Wow I've been gone a long time.  But I finally have something I'm working on that might be worth showing:


Having decided Maya was too expensive to pay for, even on a subscription basis, I've gone back to Blender.  Lately I've noticed that Blender's rendering capabilities had become much stronger than I had remembered from before my Maya days, so I've been trying to get myself to use them more.

My current project is to try to take ships from Star Trek and overhaul the detailing and materials to be as realistic as possible.  I want to see Star Trek have the feeling of really being in space in the same way that movies like 2001 A Space Odyssey, Gravity, and Interstellar have been given, but without sacrificing the fantastic technologies employed by Starfleet and other starship manufacturers of the Univserse.  It's also important to me that the overall silhouette of the ships are as unchanged as possible as they tend to be iconic, but I want to update some system details so they appear to work as described on screen or in technical writings about them.

I've started with literally the most basic design I could find, and that is the Type 15 Shuttlecraft from Star Trek: The Next Generation.  One obvious difference I've introduced is the RCS thruster housing inspired by those on Space X's dragon spacecraft.

Friday, January 24, 2014

CG Project Update

Just an update to last week's post.


I've added a number of things to the scout ship.  The most notable is probably the bridge cupola, inspired by the cupola on the International Space Station.  The bridge of this ship will be half-immersed in the ship's hull.  The cupola does not represent the full height of the bridge.

Another important addition is the weapon system - an antimatter plasma cannon on each side of the forward hull.  These cannons accelerate anti-hydrogen plasma with magnetic fields in a way similar to a particle accelerator to 50,000 metres per second.  The bursts are extremely tenuous so that the plasma doesn't disperse too quickly, and also because very little antimatter is needed to do serious damage, and as a result the plasma bursts are fairly dim.  To combat recoil, each cannon has a pair of RCS thrusters that fire simultaneously with the cannon, opposite the direction the cannon is firing.

The sphere is a placeholder for the reactor

I'm holding off on modelling the hull until I have all the external systems modeled.  This will be a while, as remaining systems involve truly fictional technologies, such as the warp drive, and various shield systems, and will therefore be harder to make look realistic.  I've started modelling the internal structure to give me an idea of how the hull will be laid out, and I've started planning out the RCS systems.

Saturday, January 18, 2014

New CG Project

I have been employed as a character animator on Jake and the Neverland Pirates at Mercury Filmworks for nearly 8 months now.  During this time my energy has been focused on improving my skills in Toon Boom Harmony.  But never during this time have I forgotten to stay fluent in 3D with Autodesk Maya.  I've been keeping myself familiar with the interface with minor dabblings, but now I want to take on something more ambitious.  After seeing the movie Gravity and being stunned beyond belief by the detail and physical realism in a film that managed to majorly succeed at the box office, my own animation and modelling standards have skyrocketed.  Since then I've felt too intimidated by my own standards to start anything, but I've now decided to start anyway and work on my skills so that someday I may actually meet those standards.  This is that start:


Warning!  Science content ahead!

These are engines and a docking port for a scout ship I'm modelling.  I'm trying to reference real technologies and really think about how this ship will function.  The docking port is somewhat inspired by the one used by the Russian Soyuz spacecraft, employing a protruding probe to help the docking ports align during docking.  

The engines are modeled after magnetoplasmadynamic engines.  These engines would produce thrust by accelerating ionized gas using electromagnets.  The amount of thrust and specific impulse (fuel efficiency) for these engines is limited only by the amount of electrical current that can be sent into the electromagnet.  This ship will be powered by photovoltaic absorption of high energy photons created by antimatter annihilation in a reactor.  The amount of power produced by this reactor would be enough to provide the ship a delta v of several hundred thousand metres per second.  (Means it can go very far on a tank of gas)

Thursday, April 25, 2013

Harmony Lip Sync: Final

Here is my final Toon Boom Harmony assignment:


College Done! Short Film and Demo Reel

The end of the semester has come, and my Short Film and Demo Reel are complete.

My film, "Attack of the Pirates"


My Demo Reel


Monday, March 11, 2013

Wayne Starr

My character for my film, Wayne Starr, in the Cockpit of his cargo ship.


Sunday, March 3, 2013

Wednesday, February 13, 2013

First Rendered Scene

This is the first scene to be rendered for my student film.
 

Monday, February 11, 2013

Spaceship re-design

So, as is almost always the case, my original film idea was deemed too long, and too compicated.  So I had to simplify the script, and that called for a new ship design.


A Mighty Pen

After a meeting with Ken Maruyama, from Sony Imageworks, I decided to start learning to model more realistic things.  In this case I modelled a pen which I recieved from High School:


Friday, June 29, 2012

Spaceship Update - Textures

So I finished the modelling for the exterior of the spaceship, and have put some more work into developping the textures.  I've made some adjustments, adding a bump map and increasing the amount of detail going into these textures.


I also experimented with making the engines gold, but I'm probably going to have to scrap the idea, as it's not looking all that great.  I thought of using gold as there is often gold foil or something on real spaceships, and adding gold to the pallate might make the ship feel more space-worthy.

Thursday, June 21, 2012

3rd-Year Film Spaceship WIP Introduction

Now that I'm well into the summer, I've gotten myself busy building a spaceship for my 3rd year film.  It is a military antimatter star-tanker used to transport antimatter fuel from the production facility to a designated carrier, where it is stored and distributed to smaller military craft.


So far I have most of the dorsal (top) features modelled, and I've experimented with some textures.  So far I'm somewhat satisfied with using a regular colour map and a subtle specular map.  I've also tried out a few special effects for beams and rockets - although I don't actually plan to use the beams in the film.  The rocket flares were made using a transparent flame shaped mesh and incandescence map, with the glow turned on and source hidden.

Sunday, April 15, 2012

Colossus - Class Battle Carrier

Today I thought I'd post something I've been working on in my (limited) spare time. 


It is a star ship comparable in size to a large airport.  The Colossus-Class Battle Carrier's military purpose is to transport a large fleet of smaller craft which can be deployed over a large area with the intent of outflanking the enemy force, and creating also a targeting challenge for the enemy by using smaller, more maneuverable craft.  These craft would be deployed well ahead of the Battle Carrier itself, due to the fact that the carrier's massive profile makes it an easier target.  Weapon power in this sci-fi universe is more devastating compared to the ship's defensive systems, so trying not to be hit is a major factor for space combat tactics.  This is done by keeping your ship far enough away from the enemy that the helmsman can react to and avoid incoming fire.

Anyway, with regard to the design, I've been trying to practice my modelling skills by employing techniques taught by my instructors here at Algonquin College.  That largely involves trying to keep all my polygons as 4-sided polygons, and avoiding "tri's" or 3-sided polygons.  This creates a challenge (at least with Maya) for precise modelling of features such as panels and door openings as boolean operations - operations that can combine meshes or cut holes in meshes based on the geometry of other meshes - are frowned upon by my instructors, due to their tendency to create messy meshes which result in strange lighting anomalies.  So I must create these panels, doors etc. with just the basic modelling tools, such as extrusions and edge loops.  This offers a significant challenge when trying to cut a square door in curved surface while maintaining the curve on that surface.

Saturday, March 31, 2012

Whaddaya Lookin' at MEEE for?

My first Lip-synch assignment for your listening pleasure... but more importantly I found this assignment rather fun compared to other harmony assignments.  My class has been receiving more harmony assignments recently to develop enough familiarity with the program to be able to take on summer jobs with animation studios using harmony as their primary animation software.

Friday, March 23, 2012

Shading in Photoshop

This next post is probably my favourite assignment of all, mostly because it involved problem solving with perspective drawing.  We were given a scene of four basic geometric forms, and our assignment was to pick a light source and use perspective construction to find the shadows and shade the forms.  The first image here is the final product, and the second is all the construction I used to find the shadows.


One curious thing about this set up was that I discovered that the sphere intersects both the box.  I was able to find where it did this, and attempted to shade it appropriately.

Uncle Iroh Model

This next post is of a model I made for my Digital Character Design class.  Our first assignment was to model a popular cartoon character, and I chose Uncle Iroh from Nickelodeon's Avatar: the Last Airbender TV series.  This is the first character model I have ever completed. 

My favourite part of this assignment, however was the lighting.  At least four area lights were used for fill lighting and reflected light, and one directional light to simulate the sun.  As for the modelling, I found the hair the most challenging, and I think I could have done better.  Getting the creases of the face was a fun process though, and the cloth bow and the trim on the armour were fun to model.

Sound Synch

Here is my first 3D animation of this semester.  Last semester we did basic motions such as bouncing balls, and walks.  This semester we are getting more into acting.  

The following video is our first sound synchronization assignment.  We had the option of choosing a guitar or drum clip.  Obviously I chose the guitar.  My favourite part of this assignment was figuring out the chords on the guitar.  The jump was also fun to animate, although much credit goes to my teacher, Steven Young for showing me some ideas to make it more "yummy."

Make sure your volume is turned down.  It turned out louder than I was hoping for.

Saturday, March 12, 2011

Why are there Whalers on the Moon?

This is why!


[Note:  the video window is extremely glitchy using Safari.  There are no issues using Mozilla Firefox]


This is my latest completed animation.  It is for an assignment called the Anijam, where every student is given the same drawing by the professor, and has to create an animation that both starts and ends with that drawing.  Included in this post are two "paths of action" which were used for the whale and earth animation.

First is the whale's path of action.


This path of action is very similar to one of a previous animation I did for my final in the first semester - the Fish Swim.  First I drew a path of where I wanted the whale to appear on the screen.  Then, using a floor grid on a separate sheet, I figured out the whale's "ground" position, so that I could determine the perspective of the path.  The three blue crosshairs on the bottom of the drawing show the whale's width at that point in the picture, and from there I could draw construction lines on each of the animation drawings to the ground position of the whale, to determine the size of a sphere which I used to judge the proportions of the whale.  The ground path, also gives me an idea of how much foreshortening to use on the whale.

The second "path of action" is that of the Earth


Now I realize this isn't exactly a path of action.  I use the term for lack of a better word because like a path of action, it lets me know what positions certain parts of the model will be in at specific times.  In this drawing, I broke the circle down into ellipses, using trigonometric calculations of 10 degree increments to determine the semi-minor axes (distance from the closest part of an ellipse to its centre, to its centre) of the ellipses.  For example, the calculation, sine of 10 degrees multiplied by the radius of the circle was used to find the semi-minor axis of the smallest ellipse, and sine of 80 degrees x the radius was used to find the semi-minor axis of the largest ellipse.